Dressage Training: How To Collect A Horse
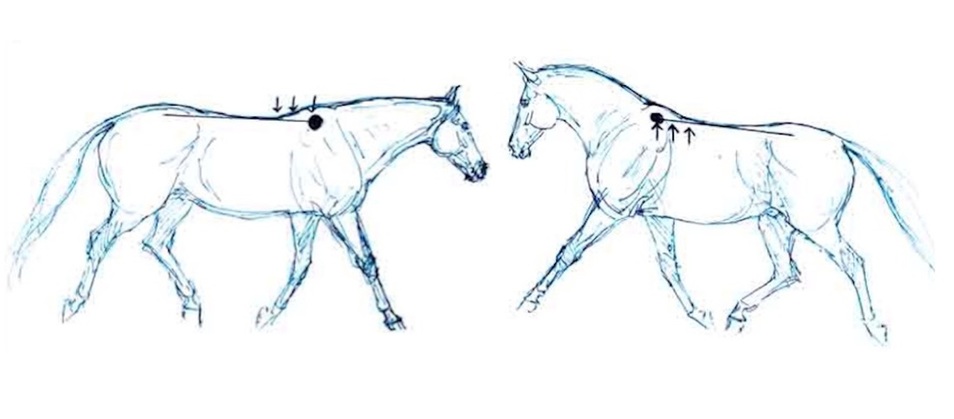
Collection is a frequently misunderstood term. It has nothing to do with putting the horse's face on the vertical and everything to do with gathering up your horse's energy to strengthen his body and to put brilliance into his gaits. (Photo Credit: Renate Blank, CC BY-SA 2.5 via Wikimedia Commons--modified)
|
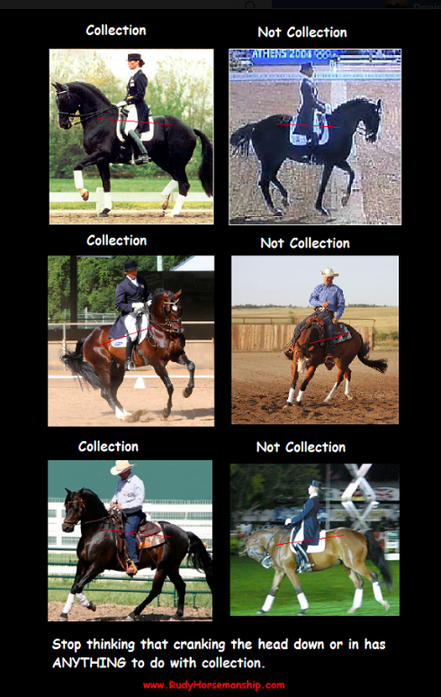
This brilliant visual from Rudy Horsemanship shows the difference between collected and uncollected horses. If you were a horse which way would you prefer to be ridden—with your head cranked down, your back hollow, and your legs trailing behind you, or with your legs under you, your back raised, and your face comfortably relaxed in your rider's hands?
Collection is the aim of all good riding simply because it is good for the horse. It is a way of strengthening the horse's topline, putting brilliance in his gaits, and improving his longevity. Horses that are not ridden this way invariably have sway backs, weak haunches, and lameness problems. That being said, don't expect that every dressage rider or trainer understands what the term means or how to develop it in your horse. Here is what you need to know. |
Step 1: Perfect your basic half halt. If you can't execute a good half halt, you can't collect your horse. Period. A half halt does not mean slowing your horse down. It means rebalancing your horse by shifting his weight toward his haunches, bringing his hind legs under him, and raising his back.
Start by riding your horse forward, allowing your pelvis and legs to gently flex and follow your horse's movement. (If you can't sit the trot without bouncing and gripping, you can't do an adequate half halt.) Then perform a half halt to rebalance your horse. Here's how:
Start by riding your horse forward, allowing your pelvis and legs to gently flex and follow your horse's movement. (If you can't sit the trot without bouncing and gripping, you can't do an adequate half halt.) Then perform a half halt to rebalance your horse. Here's how:
Stretch up through your torso without raising your shoulders. You just want to lengthen your torso. Now tighten your abs (just as you would in Pilates, yoga, or martial arts). You will feel your pelvis rotate under you as you do this and your pubic bone rise up toward your navel. This stops your own motion, which will impede your horse's movement.
At the same time as you lengthen your torso and rotate your pelvis, stretch your legs down as though you were going to put them flat on the ground. Close your legs on your horse's barrel. Apply gentle pressure. This provides the impetus for him to keep his energy focused on going forward.
At the same time, close your fingers around the reins like you are squeezing a sponge. Don't pull the reins back. Instead, squeeze your hands and bend your wrist so that your thumb points slightly down, as though you were gently pouring something from a pitcher.
The combination of these movements will take all of that forward momentum and shift the energy back toward the horse's haunches. His body will shorten from front to back as his back rises and his hind legs step further under his belly, thereby lowering his croup. Your leg aids will also engage your horse's belly muscles to allow him to raise his back.
Ride your horse forward at this level of collection just for a few strides, then go back to working or medium trot or canter. This is hard work for your horse! It will take time for his muscles to develop enough strength to ride in collection for longer periods. Patience is the key.
Here are three photos from Classical Dressage Scotland that beautifully illustrate these concepts.
Step 2: Refine your half halt. Once you can perform step 1 with ease, put the final touches on your collection. They secret to this is appreciating that your horse has two sides to her body, and the timing of your aids must be synchronized with each side's movement.
You want to bring your horse's hind leg more under her body. But you can only influence a hind leg when it is lifting off the ground, and you can only influence a hind leg with your own leg. The reins won't due it. Apply pressure with your right leg when the right hind is rising, and your left leg when the left hind is rising. If you're not sure when that is happening (and you should be, but that's another story), look at your horse's shoulders. In trot, the right hind is rising when the left fore is reaching forward and vice versa. (Remember when you used this trick to learn your trot diagonals? Same thing applies here.)
Put a bit of polish on your leg aid as well. Rather than just squeezing, think instead of gently applying pressure with your heel (or spur) to lift your horse's ribs. If you have ever stroked your horse's belly from the midline to her ribs in order to give her a bit of a massage, you know that this action causes her to raise her back slightly on the side being stroked. You're using the same principle here. You may also squeeze the reins slightly more on the same side.
These gentle movements lay the foundation for more advanced movements such as tempi changes, passage, and piaffe. But for now, they simply improve your horse's collection.
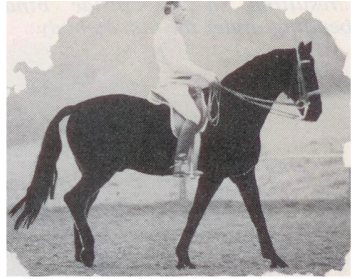
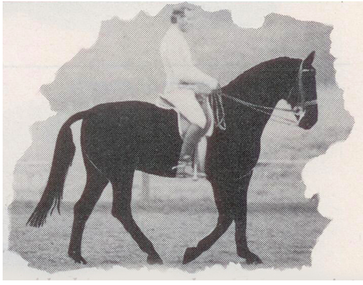
Here are some photos from the late Christian Thiess' Horse Magazine article that illustrate these concepts. In the first photo, the inside hind leg is beginning to leave the ground. This is when the rider's inside leg aid will be most effective. In the second photo, the inside hind leg is returning to the ground. The inside aids should be relaxed. If the rider tries to apply the leg now, it will be ineffective and confuse the horse. You do the same on the outside--apply the outside aids when the outside hind leaves the ground and relax them went it returns to the ground. I strongly recommend reading his entire article as it explains these aids in detail.
|
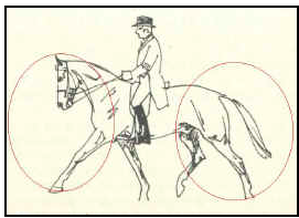
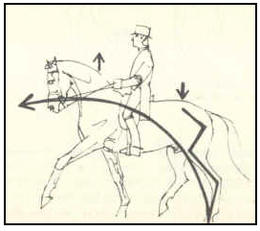
Step 3: Lift the base of the neck. Look at the diagram to the left, taken from the excellent article on collection by Sustainable Dressage (which I recommend you also read.) Notice that as your horse's weight is shifted back onto the hind legs, it is possible for her to raise her head, neck, and shoulders while flexing at the poll. The rein aid for achieving this is quite simple: |
Squeeze the reins to soften the jaw. Once your horse relaxes her jaw, shorten your reins so that she flexes at the poll. Don't pull her head down. The point is that once she is carrying more weight in her hindquarters and has used her belly muscles to lift her back, you can allow her to raise her neck at the base. Shortening the reins doesn't pull the horse's head down. Instead, you have lowered her croup and shortened her carriage from front to back. As a result, you must shorten your reins to maintain the same steady contact you had before you collected her. As you do this, she will raise her forehand from the base of the neck.
|
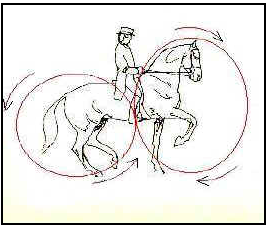
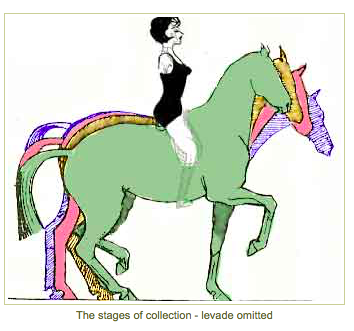
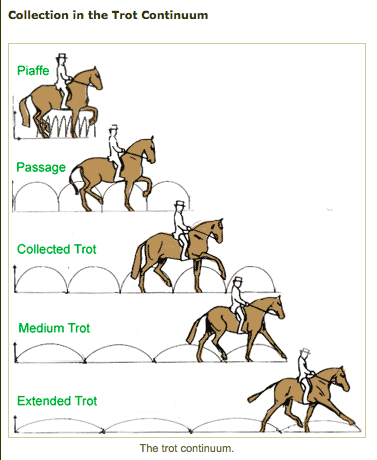
The end result: So you've slowly developed collection by judiciously using the half halt to shift you horse's weight back onto her hind legs, activated her belly muscles with your leg aids to raise her back, and shortened your reins to raise her neck and flex her poll. Once all of that has happened, your horse's gait will be more elevated and her gaits will be shortened. All of that activated energy in her powerful haunches, back, and neck will put brilliance and spring into her gaits. The illustration at the left (also taken from Sustainable Dressage) shows the difference among the gaits as one works up to collection, and how correct collection is absolutely necessary for advanced moves like passage and piaffe.
|
Follow these steps to develop collection at a slow and steady rate of progression. You will be absolutely amazed at how much more comfortable your horse is to ride. Your horse will thank you because, done right, collection will make her body stronger and more flexible, and her back better able to support your weight.
You can read more about half halts here and here
You can read more about the difference between working, medium, extended, and collected trot and canter here.
You can read more about collective movements here.
You can read more about degrees of collection here.
Happy riding!
Copyright Denise Cummins PhD July 13, 2016; updated July 4, 2018
We thought you'd also like...
|
MDC Hinged
Stirrup |
Equestrian Themed
iPhone Cases |
Sports Medicine
Boots |
Wireless Communication System
|
