|
|
|
Horses start life crooked (more stiff on one side than the other) and carrying the majority of their weight on their forehand.
To carry a rider without undue strain, the horse needs to have a strong back, carry more of his weight in his hind, and be equally strong and supple on both sides.
The rider's job is to help the horse develop his muscles properly. To accomplish this, dressage training starts with circles, then introduces more advanced movements such as shoulder-in, travers, and renvers. The horse has to bend properly through his body in order to ride these movements well, and has to carry more weight on his hind legs. You can read more about what shoulder-in, travers, and renvers are for here.
Before you begin training renvers
Before you train renvers, your horse should already know how to go forward on the bit with rhythm and balance. You should have a secure seat--perfectly balanced with soft hips that flex with the horse's movement. Your horse should also know how to do shoulder-fore and leg yielding. You should already know how to rebalance and engage your horse's hindquarters using the half-halt. And your contact should be elastic and "alive". (Click on the bolded terms for instructions on how to develop these skills.)
Your should also have a "feeling awareness" of which hind leg is lifting as the horse walks, trots, and canters. The reason for this is that you will need to use your leg aids to assist the horse in bringing his inside hind leg under his belly, and you can only influence a hind leg when it is lifting off the ground. (For more about how to develop this awareness, see my article on leg yielding.) Your horse should also be familiar with how to ride shoulder-in. (This isn't necessary, but horses seem to find learning renvers easier after learning shoulder-in than vice versa.)

WHAT RENVERS LOOKS LIKE
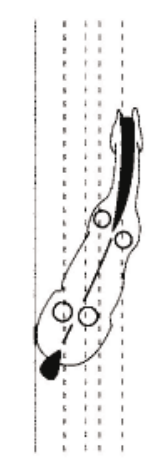
This FEI diagram shows the essentials of the travers (haunches-in) movement. (Photo Credit: FEI. org)
Imagine you are walking your horse on the rail, forming two tracks. Her left legs are on the far left track (near the rail) and her right legs are on the second-to-left track.
Haunches-out is called haunches-out because the horses haunches remain on the rail while the shoulders shift toward the inside of the arena. The bend is the reverse ("renvers" of shoulder-in. (Another name for haunches-out is "croupe au mur", which means "rear to the wall" in French. You can see why from the diagram.)
In the diagram, the horse's front legs have shifted over to the right, each traveling on its own brand-new track. The horse's neck and body bend around the rider's OUTSIDE leg at a gentle 30 degree angle.
The top photo shows a snapshot of what it looks like when ridden. And this excellent YouTube video shows show a horse learning to transition from shoulder-in to renvers so you can see the difference in the bend. Notice that the horse is bend around the left leg in both movements. The video opens with the rider riding shoulder-in toward the camera with the rider's left leg serving as the inside leg, and the horse bends toward the inside of the arena. Then she crosses the arena diagonally, and rides renvers toward the camera with her left leg serving as the outside leg, and the horse bends toward the rail.
The Aids For Training Renvers in a Nutshell
Shoulder-in and travers are best taught by first riding a small circle and then holding the bend down the rail But that will NOT work for renvers because the bend is the opposite of the circle's bend.
Method 1: A good way to learn renvers is to do just what you saw in the video above. Ask your horse to bend around your left leg--more bend for shoulder-in than renvers. Then practice in the other direction, asking your horse to bend around your right leg.

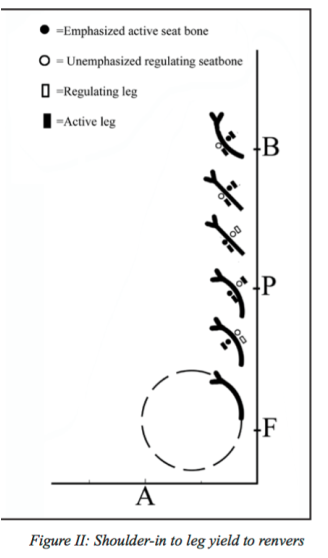
Method 2: Another way to train renvers is to make it a two stage process as shown in this USDF diagram and as described by USDF here. First, practice making transitions from shoulder-in to leg-yield. In shoulder-in, the horse bend around your inside leg (which is at the girth while the outside leg is behind the girth. The diagram shows riding a circle to prepare for shoulder-in, but in my opinion, you and your horse should be able to move directly into shoulder-in without the necessity of riding a circle before starting to train renvers.) Then you move your inside leg back behind the girth and use your outside rein to straighten the horse, your inside leg still driving her forward so that she leg-yields along the rail. Continue practicing this in both directions until your horse clearly understands your aids--"bend this way and go forward, now straighten and go toward the wall, now bend the other way and go forward".
Once you both have this down pat, move on to the next stage: While your horse is leg-yielding down the rail, ask for a reverse bend by weighting your outside seat bone slightly and pressing your outside leg at the girth. This asks your horse to bend in the direction opposite to shoulder-in. Once your horse bends around your outside leg, use your outside leg to drive her forward down the rail. Your inside rein should be soft to keep her jaw soft, and your outside rein should be firm to prevent her shoulder from popping in toward the arena or her neck bending too much. Just a few steps are sufficient at first. And be sure to straighten her before you reach the corner.
Method 3: Another way to teach your horse to be responsive to your aids (bend this way, now bend that way), is to practice bending her on a small circle. (A volte is a six-meter circle). Here is a YouTube video that shows this exercise. Notice the the rider is using a change in leg position and seat bone pressure to ask the horse to bend around his leg.
Happy riding!
As long as you’re here, check these out!
Dressage For Everyone
Six Vital Horse Facts That Every Horseowner Needs to Know
Equestrian Products That Make Your Riding and Horse Care Easier and Better!
The Thinking Equestrian
Copyright Denise Cummins February 22, 2016; Updated May 28, 2024

